Pages

Wednesday, 28 May 2014

Apple Pie

Nothing beats a nice big slice of freshly baked, warm apple pie for dessert on a cold winters night, and lately here in Dunedin, NZ it has been FREEZING! Needless to say, this was the perfect way to end a meal on a cold, snowy evening.


If you have been following me here for a while you will probably recognize this recipe from right back at the start of this year, again this was a recipe that, looking back, I wasn't completely happy with the old photographs so out came the recipe and new camera again! I hope I have now given this lovely pie the loveliness it deserves.


Apple Pie


Serves 8 - 10

Sweet Shortcrust Pastry:

2 1/4 Cup plain flour
225 g butter, chopped
1/2 Cup caster (superfine) sugar
2 eggs (1 whole + 1 yolk)

Pie Filling:

7 Granny Smith apples, peeled, cored and diced
1/4 Cup white sugar
1/4 Cup brown sugar
1 tsp cinnamon
1/2 tsp ground nutmeg

1. Make the pastry by mixing the butter with the sugar until just combined. Mix in the flour followed by the egg and egg yolk. Keep the extra egg white aside for glazing the top of the pie before baking. Combine the mixture together into a dough using your hands. Shape into a ball, wrap with cling film and refrigerate for at least 45 minutes.

2. Roll 2/3 of the pastry out on a flat, lightly floured surface and press into a greased pie dish. Blind bake at 200C (400F) for about 10 minutes.

3. Place all the filling ingredients into a bowl and combine well. Pour into the pie case. Roll out the remaining 1/3 of the pastry for the pie top. Arrange top piece of pastry over top, use a fork to pierce a couple of holes in the top, glaze with the egg white mixed with a dash of milk, and bake at 180°C for 45 minutes.

4. Serve warm with cream, ice cream, or custard. 

Tip: If the pastry is too hard to work with when rolling out, put it in the fridge for a while to firm up a bit and it will make it easier to roll out

Tuesday, 27 May 2014

Chocolate Fudge Slice

Here's another recipe that I posted way back when I first started my blog: my all time favorite chocolate slice. Just like yesterdays post I used my brand spanking new camera to provide you with photos that are at least a million times better than those on the original post. Enjoy :)


When I was a kid my Mum used to make this slice all the time (without a few ingredients that I have since added in, and with sprinkles!) so you could definitely say that this is a favorite of mine. It's also the first thing I ever learnt to bake by myself. I must have been about 11 or so and Mum was in the kitchen watching me. I misread the recipe and added 20 g of butter instead of 200 g. Oops. But I got there in the end and I have never made that mistake again.

This is a REALLY simple slice. It takes next to no time and it always comes out tasting wonderful.


Chocolate Fudge Slice

Makes at least 16 pieces

250 g (9 oz) Vanilla cookies
4 Tbsp cocoa
1 Cup light sweetened condensed milk
200 g (7 oz) butter
2 tsp vanilla extract
3/4 Cup shredded coconut
1/2 Cup chopped peanuts

Chocolate icing:

1/2 Cup dark chocolate chips
1/4 Cup cream
1 1/2 Cup icing sugar

1. Put the cookies into a food processor and whiz to a crumb. I like to not take it too far so that there are still a few chunks of biscuit in there).

2. Combine the cookie crumbs, coconut, and peanuts in a large bowl.

3. Melt the butter in a saucepan together with the condensed milk and cocoa. When it is all melted nicely and getting hot remove from heat and stir in the vanilla extract.

4. Mix into the cookie mixture and pour into a lined slice tin. Refrigerate until firm, ice with chocolate icing* and refrigerate again until icing is set. Cut into slices and store in a sealed container in the fridge.

Chocolate icing: Melt the chocolate chips into the cream. Stir in sifted icing sugar. Spread over the top of the slice.


Monday, 26 May 2014

Milk Chocolate Strawberry Cheesecake

This was the very first cheesecake recipe I ever wrote and posted to my blog. It's an absolutely delicious combination of strawberries and chocolate, using a soft-center strawberry filled milk chocolate. Using soft centered chocolate gives this cheesecake the most decadent creamy texture.

The only problem with the post was the picture. I believe that it was up there with the worst food photography pictures ever taken. I'm SO embarrassed by it that I'm not even going to put it in here as an example. But I'm sure I can be forgiven for my atrocious photography at the stage, I still had no idea what I was doing and I'm still learning!


I got a new camera last weekend (a Canon Digital SLR), this is the first post you are seeing with photos from it! Hopefully you'll be seeing a huge improvement in photo quality from now on. 


Milk Chocolate Strawberry Cheesecake


Serves 12

350 g (12 oz) chocolate cookies
85 g (3 oz) almost melted butter
500 g (18 oz) cream cheese
1/4 Cup sugar
250 g (9 oz) block Whittakers Milk Raspberry block* (or similar)
1/4 Cup
1 Cup whipped cream
Fresh strawberries to garnish


1.  Grease or line the base of a 23 cm springform cake tin (or as close as you have, doesn't really matter).

2. Blend the cookies in a food processor, add the butter into the food processor with the cookies and  process until well combined. Press into the base and up the sides of the prepared cake tin. Put in the fridge to chill.

3. Beat the cream cheese and sugar until light and fluffy and until there are no clumps of cream cheese.

4. Break up the chocolate and place in a heat proof bowl over a saucepan with a small amount of simmering water with the 1/3 Cup liquid cream and melt.

5. Add the chocolate mixture to the cream cheese mixture, mix well to combine.

6. Fold in the whipped cream, pour mixture over the chilled base, cover, and refrigerate for at least 2 hours, until set.

7. Garnish with the strawberries before serving.


* This is the chocolate I used, anything similar would be fine :)

Friday, 23 May 2014

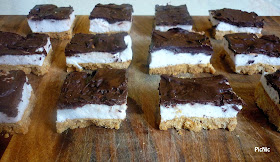
Raspberry and Vanilla Marshmallow Slice

My PhD supervisor gave me a recipe that she had found for a marshmallow slice. I loved the idea so I came up with my own version.

It was my first time making marshmallow and I was surprised by how easy it was! It was actually really fun, although it did start to set a lot quicker than I anticipated which meant I may have made a slight mess but at least I didn't have to wait long at all before I could add the chocolate topping and give this one a taste.


This recipe made so many little pieces of slice that I had enough to share around all over the place. I brought half of it into my office for morning tea, where it was very well received, and left the rest up for grabs on the kitchen bench where it went down equally as well.


Raspberry Vanilla Marshmallow Slice


Makes about 20 pieces

Base:

1 Cup plain flour
1 Cup desiccated coconut
3/4 Cup brown sugar
250 g  (9 oz) plain cookies, processed to a crumb
100 g (3.5 oz) butter, melted
1 tsp vanilla essence

Filling:

1 Cup water
25 g (0.9 oz) gelatin
1 Cup sugar
2 tsp vanilla essence
2 tsp raspberry essence

Topping:

200 g quality dark chocolate
1 Tbsp neutral oil

1. Preheat oven to 180ºC (355ºF) and line a slice pan with baking paper. Combine all of the base ingredients, press into the base of the prepared tin and bake for 20 minutes, until nice and golden. Set aside to cool.

2. Place all of the ingredients for the marshmallow filling in a saucepan over a medium heat. Bring to the boil, stirring, cool, and beat until fluffy (takes a while but just keep at it!).

3. Tip the filling over the base and refrigerate until set (about an hour).

4. Melt the chocolate with the oil. Stir well and pour over the set marshmallow, return to the refrigerator until set before cutting into squares or slices. Store in an airtight container in the refrigerator.


Thursday, 22 May 2014

Sesame Chicken Tenders and Coconut Rice

Chicken tenders make a great weeknight meal that you can have on the table in around 30 minutes. The combination of sesame seeds and oil with coconut milk is perfectly complimentary, and the addition of coconut rice makes a fantastic and quick complete meal.


Sesame Chicken Tenders and Coconut Rice


Serves 4

Chicken Tenders

500 g Chicken tenderloins 
1 Tbsp sesame oil
1 Tbsp low sodium soy sauce
1 Tbsp Sweet chili sauce
1 Tbsp Coconut milk
1/2 Cup Sesame Seeds


Coconut Rice

2 Cup rice (I used basmati)
2 Cup water
2 Cup coconut milk

1. Preheat the oven to 200ºC (390ºF). Mix the sesame oil, soy sauce, sweet chili sauce, and coconut milk together in a small bowl. Spread sesame seeds out on a plate.

2. Dip chicken tenderloins in the sauce, spread through the sesame seeds, place on a lined baking tray and bake for 20 minutes (until cooked through). Turning halfway through cooking. 

3. Place the rice, water, and coconut milk into a saucepan over a medium heat. Bring to a gentle boil. Reduce heat to a simmer and cover. Cook for about 20 minutes, until the liquid is absorbed. 

Tuesday, 20 May 2014

Peanut Butter Truffles

Truffles are one of those treats that just melts in the mouth. They are simple to make and a real crowd pleaser.

 Everyone loves peanut butter and chocolate so here is my easy recipe for peanut butter truffles.


Friday, 16 May 2014

Beef Nachos

Not only are nachos delicious, but they make a great quick and easy lunch or dinner. The key to a good nacho recipe is a great chili, and here is mine. I hope you will like it as much as I do! There is also a whole heap of different ways to use up the left overs too!


Beef Nachos


Serves 4

500 g beef mince
1 onion, finely diced
400 g can of tomatoes
400 g can red kidney beans, drained.
3 Tbsp tomato paste
2 tsp smoked paprika
1 tsp Cayenne pepper
1/4 tsp dried chilli flakes
1 tsp garlic powder
1 bag corn chips
8 Tbsp light sour cream
1/2 Cup grated cheese
2 Spring onions (scallions), chopped.


1. Heat a dash of oil in a large fry pan (medium heat). Add the beef and onion and fry until the mince is browned. Add the tomatoes, kidney beans, tomato paste, and the spices and stir well to combine.

2. Bring to a simmer and simmer for about 15 minutes, until the beef is cooked and the sauce is nice and thick.

3. Serve over corn chips, topped with grated cheese, sour cream, and spring onion.


Wednesday, 14 May 2014

Raspberry White Chocolate Buttermilk Scones

I had some leftover buttermilk from making bread. Scones made with buttermilk are always so light, fluffy, and delicious, so it was easy enough to decide what to do with the buttermilk!

These sweet scones contain both raspberries and nice big white chocolate chips. Any berry or type of chocolate would work very well.


Sweet scones make a great breakfast or a snack with a nice cup of tea or coffee. They are quick and easy to whip up too!


These scones have become one of the most popular recipes on my blog, so I have come back to it and updated the photos to something I am A LOT more happy with.


Raspberry White Chocolate Buttermilk Scones


Makes 12

3/4 Cup buttermilk
1/4 Cup stevia (or sugar)
1 egg
2 Cups plain flour
1 Tbsp baking powder
1/2 tsp salt
3 Tbsp butter
1 Cup frozen raspberries
1/2 Cup white chocolate chips

1. Preheat oven to 180ºC (355ºF) and line a baking tray with baking paper.

2. Combine the buttermilk, stevia, and egg in a bowl. Whisk.

2. Sift the flour, baking powder, salt, and butter into the bowl of a food processor and process into a course crumb.

3. Tip into a bowl, fold in the chocolate chips, and add the buttermilk mixture. Combine.

4. Knead lightly. Shape into a circle on the baking tray, cut into 12 even size pieces and bake for 20 minutes.

Thursday, 8 May 2014

Chili Chicken Calzone

This was my first ever attempt at making a calzone! I know that this isn't a "traditional" calzone: with tomatoes and cheese but it was fantastic nonetheless.


Chili Chicken Calzone


Makes 2 large or 4 small

600 g chicken breast, cooked and shredded
1/2 Cup sweet chili sauce
1 tsp balsamic vinegar
1 red chili, sliced
1 red bell pepper
125 g Camembert 
1/2 tsp mixed herbs
2 Tbsp finely grated Parmesan
1 Tbsp garlic powder
1 Tbsp dried parsley


1. Make the pizza base following the directions in the link above (or here). Preheat the oven to 200ºC (390ºF). 

2.Mix together the chicken, chili sauce, balsamic, chili, bell pepper, and mixed herbs together in a bowl.
3. To make two large calzones, split the pizza dough in half, or into quarters to
make four smaller calzone. Roll out each piece into an oval.
4. Place some of the chicken mixture onto each oval dough
and top with a couple of slices of Camembert.

5. Fold the calzones by folding in the top and bottom edges, followed by the two long edges.

6. Top each calzone with some Parmesan, parsley, and garlic. Place on a pizza tray (a regular baking tray is fine too) and bake for about 20 minutes, until golden.


Monday, 5 May 2014

Mint Chocolate New York Style Cheesecake

This was my first attempt at a baked cheesecake. The idea came about when I was out for dinner with my boyfriend and he had a baked mint cheesecake for dessert, he really enjoyed it so I thought I would try to make one too! 

This is also an exciting blog post as it is my 100th published post! :)


Mint Chocolate New York Style Cheesecake


Serves 12

Base:

350 g (12 oz) bag Chocolate cookies
80 g (2.8 oz) Butter, melted

Cheesecake:

750 g (26 oz) Philadelphia cream cheese
3/4 Cup sugar
1/2 Cup cream
4 eggs
1 Cup sour cream
1/3 Cup Creme de menthe
3 Tbsp plain flour
2 tsp vanilla essence

Topping:

1/2 Cup chocolate, melted
Mint cookies, chopped


1. Preheat oven to 160ºC (320ºF) and grease a 23 cm springform cake tin. Crumb the chocolate cookies in a food processor, add the melted butter and process until well combined. Press into the base and up the sides of the prepared tin. Chill.

2. Beat the cream cheese and sugar until there are no lumps of cream cheese. Add the cream, mix gently, and add the eggs one at a time, mixing well between each addition.

3. Beat in the sour cream, creme de menthe, and vanilla.

4. Pour this filling over the chilled base. Bake for 1 hour, turn off the oven and leave in the oven to cool for 2 hours.

5. Chill, pipe over the melted chocolate prior to serving.. This recipe is best done a day ahead and chilled overnight.