Wednesday 30 October 2013

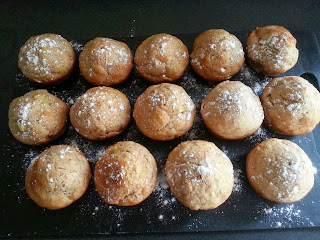
Banana Honey Muffins

I had some bananas that I needed to use as they had gone pretty black. I wanted to make something that was at least semi-decent nutrition wise, and I also wanted to just use ingredients that I already had in the pantry.

Banana honey muffins fitted with all these criteria, so here they are!


Banana Honey Muffins


Makes 14

2 Cups self raising flour
1 tsp baking powder
1 tsp ground cinnamon
1/4 tsp salt
1/2 Cup trim milk
2 Tbsp honey
1 tsp vanilla essence
2 eggs
1 medium bananas, mashed
1/4 Cup stevia
50 g apple sauce

1. Preheat oven to 180°C. Grease or line a muffin pan.

2.  Sift the flour, baking powder, cinnamon, stevia and salt into a large bowl. 

3. Combine the apple sauce, milk, honey, vanilla, eggs, and mashed banana in another bowl and whisk until well combined.

4. Make a well in the centre of the dry ingredients and add the wet ingredients. Stir until just combined. 

5. Spoon into the muffin pan and bake for 15 minutes, or until a skewer inserted into the centre of the muffins comes out clean. 

Nutritional Information:

Calories 102
Carbs     20 g
Fat         1 g
Protein   3 g
Fibre      1 g
Sodium   217 mg

Monday 28 October 2013

Coconut Pineapple Slice

When I was shopping for the ingredients for the pineapple cheesecake, the tin of pineapple was 2 for $2.99 so after making the cheesecake I still had a tin left over. I also have a lab morning tea tomorrow which I thought I better contribute to. These made a good basis for coming up with another recipe.

So I started with pineapple, decided that I wanted to make a slice, and pulled out a heap of different things from the pantry, chucked them all together and waited patiently to see how it turned out. It turned out lovely. The base is nice and spongy and the pineapple layer makes a great sweet topping.

I also made oatmeal buttercream pies! You can find the recipe for them here: http://www.kevinandamanda.com/recipes/dessert/oatmeal-buttercream-pies.html 


Coconut Pineapple Slice

Makes 18 pieces

432 g tin crushed pineapple in juice, drained
1/3 Cup pineapple juice (reserved from above)
150 g butter, softened
1/4 Cup caster sugar
1/4 Cup stevia
1 tsp vanilla essence
2 eggs
1 1/4 Cup self raising flour
2/3 Cup dessicated coconut plus extra for topping

1. Preheat oven to 180°C and line a slice pan with baking paper.

2. Beat together the butter, vanilla, sugar, and stevia until fluffy. Add the eggs one at a time and beat well after each addition. 

3. Add the flour, pineapple juice, and coconut and stir until combined. Spread into the slice pan. Top with the pineapple and sprinkle with extra coconut.

4. Bake for 35-40 minutes, or until a skewer comes out clean. Cool in the pan before cutting into 18 pieces. 

Nutritional Information:

Calories 159
Carbs     15 g
Fat         10 g
Protein    2 g
Fibre      1 g
Sodium   140 mg

Saturday 26 October 2013

Pineapple Cheesecake

My boyfriend and I love pineapple and love cheesecake so I thought why not try a pineapple cheesecake? I don't even know what to say about it, I think the pictures speak for themselves!

One thing I will say, this cheesecake turned out to be quite nice and light which makes a change from most cheesecakes which are very heavy. I liked this! However, I can see it being dangerous as it means you could probably eat a heap more of this than a regular cheesecake.

Cheesecakes are seriously easy to make, so why not give this one a go!


Pineapple Cheesecake


Serves 12

350 g shortbread cookies
100 g butter, softened
250 g lite cream cheese
1/2 Cup icing sugar
1 1/2 Cups cream, whipped
432 g tin crushed pineapple, drained and juice reserved
3 Tbsp pineapple juice
Pineapple lumps to decorate (If you can get them!)

1. Process the cookies to a crumb in a food processor. Add the butter and combine well. Press into the base of a springform cake tin lined with baking paper. Refrigerate while making the filling.

2. Beat the cream cheese, icing sugar, and pineapple juice until thick and creamy. Mix in the crushed pineapple and fold in the whipped cream with a wooden spoon.

3. Spread over the base and chill until set. Before serving, crush or roughly chop the pineapple lumps and sprinkle them over top.

Nutritional Information:

Calories 360
Carbs    25 g
Fat        28 g
Protein  3 g
Sodium  195 mg


Quinoa and Chia Granola (Muesli)

I ran out of my toasted tropical muesli and decided that I wanted to try something a bit more out there so I had the idea of adding uncooked quinoa and chia seeds to the oat mix before toasting. It turned out delicious!

I was going to add almonds as well, but I forgot to pick some up at the store so I just went without but I feel that they would be a tasty addition if you are going to try this recipe for yourself.


Quinoa and Chia Granola

Makes approx 12 half cup servings

3/4 Cup quinoa, rinsed
2 1/2 Cups rolled oats
1/4 Cup chia seeds
1/2 Cup shredded coconut
1/2 Cup sunflower seeds
1/2 Cup pumpkin seeds
3 Tbsp canola oil
1/3 Cup honey
1 tsp vanilla essence
2/3 Cup dried fruit (I used apricot and pineapple)

1. Preheat oven to 200°C. 

2. Combine canola oil, honey, and vanilla essence in a small bowl.

3. Combine quinoa, oats, chia seeds, coconut, sunflower seeds, and pumpkin seeds in a large bowl. Add the honey mixture and combine well, making sure all of the oats are coated. 

4. Spread the mixture onto a baking tray and bake for about 30 minutes, until the oats are golden Stir every 5-10 minutes.

5. Mix in the dried fruit and cool completely before storing in a airtight container.

Serve with milk, yogurt, or both. I had mine with berry yogurt and it was great!

Nutritional Information

Calories 273
Carbs    34 g
Fat        13 g
Protein   8 g
Fibre      6 g
Sodium  17 mg


Saturday 19 October 2013

Indivdiual Raspberry Tarts

Pastry recipes can seem a bit daunting sometimes, especially if you aren't an experienced baker so I wanted to create a simple pastry recipe for you guys.

As long as you have a food processor, the base for these tarts only takes a couple of minutes to make. By chilling the base for a while before adding the filling and baking, I didn't see the need to blind bake the pastry first, again making things a lot easier.

I am really happy with how these turned out. I was so nervous about whether I had the consistency right to allow them to set while cooking. Then I was also nervous that they would be really difficult to get out of the pan. Both of my worries turned out to be unnecessary!


Individual Raspberry Tarts

Makes 10

Base:

125 g butter, softened
1 Cup flour
1/2 Cup icing sugar
2 tsp vanilla essence

Filling:

1 Cup caster sugar
1 1/2 Cups raspberries (fresh or frozen)
3 Tbsp custard powder
1/2 tsp baking powder
3 eggs
2 tsp vanilla essence

1. Make the base by placing all of the base ingredients into a food processor and running until the pastry forms a clump around the blade. With floured hands, divide the pastry into 12 portions and press into the base and up the sides of a greased 12-hole muffin tin. Refrigerate for at least 30 minutes.

2. Preheat oven to 180°C. Place the raspberries and 1 Tbsp water into a saucepan and bring to a simmer to liquify the raspberries. Pass through a strainer to remove the seeds.

3. Place all the filling ingredients into the food processor bowl (wipe it clean first!) and combine. Pour over the chilled bases and bake for 15 minutes, until the filling is set. Leave to cool in the tin before gently removing.

4. Dust with icing sugar before serving.  

Grilled Steak Risoni

My brother asked me to create a recipe for a new pasta dish. I couldn't decide exactly what I wanted to do, so I wrote three completely different recipes. Here is the first installment.

In case you haven't encountered risoni before, it is a small rice shaped pasta. It is often included in soups but it also a great pasta to use in pasta salads and all sorts of dishes.

I love cooking risoni (and rice) the way I have done here, in the veges, stock and tomatoes. The pasta absorbs all the flavors as it cooks giving you pasta that is just bursting with deliciousness.


Grilled Steak Risoni


Serves 4

500 g Steak
1 1/4 Cups risoni
1 onion, diced
3 cloves garlic, finely diced or crushed
1 red chilli, deseeded and finely diced
2 Cups beef stock
400 g can crushed tomatoes
1/3 Cup Tomato Paste
1/2 Cup chopped flat leaf parsley
Salt and Pepper to season

1. Heat a dash of oil in a medium saucepan. Add onion and garlic and cook for about 3 minutes. Add the chilli and cook for a further minute. Add the risoni and combine well.  Add the stock, tomatoes, and tomato paste. Bring to a gentle boil, cover, and simmer for about 25 minutes, until pasta is tender and liquid absorbed. Stir it a few times during cooking so that the pasta doesn't stick to the bottom of the pan.

2. While the pasta is cooking, prepare the steak. Heat oil in a fry pan. Season the steak with salt and pepper and cook for a few minutes each side, until medium rare. Let the steak rest for about ten minutes before cutting into thin slices.

3. Stir the parsley into the pasta. Serve the steak over the pasta.

Nutritional Information

Calories 319
Carbs    33 g
Fat        6 g
Protein  34 g
Fibre     2 g
Sodium  754 mg

Monday 14 October 2013

Sesame Chicken Noodles

I had left over chicken from lasts nights roast dinner, also wasn't really in the mood to make anything too time consuming so I thought "what's the quickest thing I can make?" Noodles.

As long as you have a good quality noodle it's simple to create a quick, easy, and tasty meal.

I used sesame oil and Chinese rice wine here. Both of these are really strong flavors so be really careful to not go overboard with them!


Sesame Chicken Noodles


Serves 2

2 cakes dry egg noodles
200 g cooked and shredded chicken
1 red capsicum, diced
1 carrot, diced
3-4 cloves of garlic, crushed or diced
1/2 Cup chilli sauce
1 Tbsp sesame oil
2 Tbsp reduced salt soy sauce
1 Tbsp Chinese rice wine
sesame seeds for garnish


1. Place the noodles in a saucepan of boiling water, cover, and simmer. Heat a bit of oil in a fry pan or wok

2. Mix the garlic, chilli sauce, sesame oil, soy sauce, and Chinese rice wine in a small bowl.

3. Stir fry the capsicum, carrot, sauce, and chicken for a few minutes. Drain the noodles and add these to the pan/wok. Stir or toss to combine and heat through.

4. Sprinkle with some sesame seeds before serving.


Wednesday 9 October 2013

Low Fat Butter Chicken

It's not uncommon for me to absolutely crave butter chicken. But with a combination of not wanting to walk to the Indian takeaways and feeling the need to create something healthy I came up with this reduced fat butter chicken and I must say, it tastes pretty good!

I think the key to making a good butter chicken is the right balance of spices, I think this recipe accomplishes that nicely.


Low Fat Butter Chicken


Serves 4

1/2 tsp each of ground spices: ginger, chilli, turmeric, cinnamon, garam masala, salt
450 g skinless chicken breast, cubed
25 g reduced fat spread (or coconut oil, or butter)
1 onion, finely diced
4 cloves of garlic, crushed or finely diced
3 - 4 Tbsp tomato paste
1 Cup light and creamy evaporated milk

1. Combine all the spices in a small bowl, add the chicken and toss to coat.

2. Heat the spread over a medium heat in a fry pan, add the onion and garlic and cook for about 2 or 3 minutes. Add the chicken and cook for a further 5 minutes (smells amazing at this point!)

3. Add the evaporated milk and tomato paste, combine well and cook for another 5 minutes.

4. Serve over rice.


Nutritional Information

Calories 237
Carbs    14 g
Fat         5 g
Protein   33 g

Tuesday 8 October 2013

Tropical Toasted Muesli

Muesli is my fav. Unfortunately, it can be SO hard to find a decent muesli in the supermarket so I just figure that it's easier to make my own.

Making your own muesli doesn't take much effort at all. It's quick and easy!

I love this combination of dried tropical fruits (pineapple, a couple of melons, and mango), almonds, coconut, and vanilla.

Tropical Toasted Muesli


Makes 12 half-cup servings


3 Cups rolled oats
1 Cup shredded coconut
70 g sliced almonds
1/4 Cup canola oil
1/3 Cup maple syrup
1 tsp vanilla essence
1 Cup chopped dried mixed tropical fruits

1. Preheat the oven to 160°C

2. Combine the oats, coconut, and almonds in a large bowl.

3. Heat the oil, maple syrup, and vanilla over a medium heat in a saucepan, whisking frequently, until just hot (about 3 minutes). Pour over the oat mixture and mix well, make sure all the oats are coated.

4. Spread the mixture evenly over a baking tray with sides or roasting dish and bake for about 25 minutes, stirring ever 5 minutes, until the oats are lightly golden. 

5. Stir in the dried fruits and leave to cool completely before transferring to an airtight container. It will keep for a week or two.

Nutritional Information

Calories 250
Carbs    33.3 g
Fat        13.1 g
Protein   4.9 g
Fibre     3.4 g


Milo Chocolate Cookies

Today a friend gave me a challenge: bake something with Milo. I made cookies. Here's hoping that she likes them!

I used stevia, a natural sweetener from the Stevia plant, to replace most of the sugar. Stevia is A LOT sweeter than sugar so you only need to use a small amount. If I was using sugar, I would have used about 3/4 Cup, but I only used 2 Tbsp Stevia. If you are using this sweetner don't go overboard with it... too much will be far too sweet and also leave a weird aftertaste. 


Milo Chocolate Cookies


Makes 32

160 g apple sauce
2 Tbsp Stevia
1 Tbsp brown sugar
1 egg, lightly beaten
1 1/2 Cup self raising flour
1 1/2 Cup Milo
150 g dark chocolate drops

1. Preheat oven to 180°C and line a couple of baking trays with baking paper.

2. Sift the flour into a large mixing bowl, add the stevia, brown sugar and Milo. Mix to combine. Add the apple sauce and egg and combine well. Add the chocolate drops and mix again.

3. Spoon teaspoonful amounts of the mixture onto the baking trays and bake for about 15 minutes.

4. Cool cookies on a wire rack and store in an airtight container.

Nutritional Information

Calories 59
Carbs    10 g
Fat        2 g
Protein  1 g

Saturday 5 October 2013

Blueberry and Lemon Curd Muffins

There is a cafe near the lab that has the most amazing blueberry lemon muffins, but as with any cafe brought muffin they are really expensive and absolutely loaded with sugar. So I decided to try and write a healthier version of  this muffin flavour and this is what I came up with, no sugar and no butter but full of flavour.

My friends got stuck right in almost as soon as they came out of the oven and their comments were very positive. I waited until after they had eaten their muffins to tell them that there was no sugar or butter and they said they would have never guessed and that it tasted better than most muffins they have brought in stores.

My boyfriend doesn't like blueberries so I set aside a quarter of the batter before adding blueberries and added raspberries to his instead. They look like they turned out well! Once he has tasted them I will let you know how that combination turned out.

Blueberry Lemon Curd Muffins


Makes 12


2 Cups self raising flour
1/4 Cup Stevia (or 1 Cup of sugar if you want)
1 egg
1/4 Cup apple sauce
1 1/4 Cup skim milk
1 tsp grated lemon rind
2 tsp lemon juice
1 1/4 Cup blueberries (fresh or frozen, if using frozen they don't need to be thawed)
12 tsp lemon curd

1. Preheat oven to 200°C and grease or line a 12 hole muffin tin

2. Mix all the ingredients except the lemon curd in a large bowl until just combined.

3. Place about a tablespoon full of mixture into each hole of the tin, add 1 tsp of lemon curd per hole:


4. Cover the lemon curd with the remaining batter and bake for about 15 minutes.

Nutritional Information

Calories 98
Carbs    18 g
Fat         1 g
Protein   3 g

Wednesday 2 October 2013

Two Minute Chocolate Cake

Some of you have probably heard of "mug cakes." For those that haven't, the idea is simple: Chuck a few ingredients in a coffee mug, into the microwave and a minute or so later you have a single serve cake. basically the best idea ever.

Tonight just seemed to call for chocolate so I created this healthier version of a chocolate mug cake. Tastes great and definitely satisfies that chocolate craving.

And seriously... it literally takes two minutes from start to finish.


Two Minute Chocolate Cake


Serves One

1 Tbsp + 2 tsp cocoa powder
3 Tbsp plain flour
1/8 tsp salt
2 tsp sugar or stevia
1/4 tsp baking powder
3 tsp apple sauce
3 Tbsp milk
1/2 tsp vanilla essence

1. Mix the dry ingredients together in a small bowl, throughly.

2. Add the liquid ingredients and stir. Transfer the mixture to a ramekin, coffee cup, or some other kind of small dish.

3.  Microwave for 1 minute.

If you don't want to eat it straight out of the dish it was cooked in then spray the dish with a little oil before adding the cake mix.

Nutritional Information

Calories 137
Carbs    27 g
Fat        1 g
Protein  8 g