Wednesday, 22 January 2014

Basic Egg Pasta

Using this simple recipe, you can make all sorts of fresh pastas; fettuccine, spaghetti, lasagne, ravioli, tortellini. Just get creative with it!

Making your own pasta is really worth the little bit of extra effort. It tastes so lovely and almost melts in your mouth. It doesn't matter if you don't have a pasta machine, just use a rolling pin and roll the dough as thin as you can get it.

Traditionally, you would make pasta by making a heap of flour on a bench, making a well in the centre for the eggs, and the gradually pushing flour into the eggy centre. This takes a long time and can be hard to keep the eggs from running off along the bench. Just chuck everything in a food processor and I promise it will turn out just as good!

Homemade Pasta


Serves 4-6

2 Cups flour
3 Eggs
1/2 tsp salt
1/2 tsp extra-virgin olive oil

1. Sift the flour and salt. Add to a food processor and with the motor running add the eggs and oil, continue to process until it forms a dough.

2. Tip out onto a floured surface and knead a few times. Wrap in cling film and set aside to rest for about 30 minutes.

3. Separate the mixture into 4 and roll out each piece and either pass through a pasta machine until thin or roll with a rolling pin until nice and thin.

4. If making fettuccine, roll the pasta sheets up and slice into long strips. If making filled pasta, cut out the desired shapes.

5. Cook in a large saucepan of salted boiling water for about 4 minutes.

Tuesday, 21 January 2014

Steak and Cheese Pie

Steak and Cheese Pie is a real Kiwi classic. Homemade in the slow cooker it's a real melt in the mouth delight.


Short Crust Pastry

Short crust pastry is a great recipe to have stored away as it goes well with both sweet and savory dishes. It is easy to make and easy to work with.

Short Crust Pastry

Makes 1 pie/tart

2 Cups plain flour
180 g butter, cubed and chilled
1/4 tsp salt
1 egg yolk
2 - 3 Tbsp chilled water

1. Place the flour, butter, and salt in a food processor. Process in short bursts until the mixture resembles a fine crumb.

2. With the mixer running, add the egg yolk and chilled water and mix until the mixture forms a solid dough.

3. Tip out onto a floured surface and shape into a ball. Wrap in cling film and chill for 60 minutes.

4. Roll pastry out on a floured surface, or between two sheets of baking paper, until about 3 mm thick. Press into the base and sides of a pie or tart dish. Prick the bottom a few times with a fork. Chill for about 30 minutes.

5. Blind bake at 180°C for 15 minutes. Remove baking paper and beads and bake for another 10 minutes.

6. Cool slightly before filling.  

Monday, 20 January 2014

Cheesecake Bars

Vanilla Cheesecake on a chocolate cookie base topped with berry jelly.


Friday, 17 January 2014

Chocolate and Raspberry Puff Pastries

I was originally planning to make these on Valentine's Day for my boyfriend but he has been working really hard lately (and very late!) so I thought he needed a bit of brightening up so I made them early. However, I did then have to think of something else to make on Valentine's Day! But what I have come up with now is even better and cuter than these little pastries.

These are super simple to make, and if you have all your ingredients ready they only take about ten minutes to assemble.


Chocolate and Raspberry Puff Pastries


Makes about 10

2 Sheets of puff pastry, thawed
10 pieces (approx) quality milk or dark chocolate
10 Raspberries (Fresh or thawed, I used frozen and thawed them in about 1 tsp sugar)
25 g butter, melted with 1 tsp vanilla extract mixed in

1. Preheat oven to 200°C (400°F). Roll out the pastry on a floured surface, cut out hearts (or whatever shapes you want) using a cookie cutter.

2. Place a piece of chocolate and a raspberry on top of half of the pastry shapes.

3. Brush the edges of the filled pastry with the butter mixture, place the another piece of pastry onto and seal the edges with a fork. You may need to squish the berry a bit.

4. Brush the tops of the pastries with the melted butter and bake for about 15 - 20 minutes, until the pastries are puffed up and golden.


Serve warm, fresh from the oven =)

Wednesday, 15 January 2014

Chicken, Leek, and Mushroom Pie

Homemade pies are always a great weeknight dinner. I had been wanting to write a pie recipe for a while now and thankfully this one went down a treat. It was simple to make and uses common ingredients that you probably would usually pick up from the supermarket anyway. 

I made my own pastry for this pie, but if you don't have the time then store brought pastry would work just fine as well.

As this recipe uses cooked chicken, it would be a great way to use up leftover chicken from your Sunday roast.

I forgot to take a picture once I had cut into the pie, was pretty impatient to start eating it. So you'll just have to believe me that it looked lovely from the inside too. 


Chicken, Leek, and Mushroom Pie

Serves 4

Short crust pastry or 2 Sheets store brought shortcrust or puff pastry
Olive Oil
4 Cloves garlic, crushed or finely diced
1 leek, finely sliced
200 g button mushrooms, sliced
400 g chicken breast. Cooked and finely shredded
2.5 - 3 Cup chicken stock, warm
3/4 Cup milk
1-2 tsp wholegrain mustard
salt and pepper
1 egg + 1 Tbsp milk, beaten together


1. Make the pastry according to the directions. Make the pie filling while the pastry is chilling.

2. Roll out half the pastry and press into the bottom of a greased pie dish (I used a 20 cm springform cake tin and it worked wonderfully).

3. If you don't want the pastry going soggy after cooking the pie then blind bake for about 10 minutes at 190°C. Remove the baking paper and beads and cook for another 5 minutes. Set aside to cool while you finish the filling.

Pie Filling:

1. Heat the oven to 190°C, if not done already. Heat a dash of olive oil in a large saucepan over a medium heat.

2. Cook the garlic, mushrooms, and leak for 5 minutes. Add the chicken, stock, milk, mustard, salt and pepper. Bring to a simmer and cook until the sauce thickens (about 10 minutes). Leave to cool for about 10 minutes before transferring to the pie dish.

3. Roll out the other half/sheet of pastry and lay over top of the pie, brush with the egg wash and bake for 30 minutes, until the top is golden.   

Tuesday, 14 January 2014

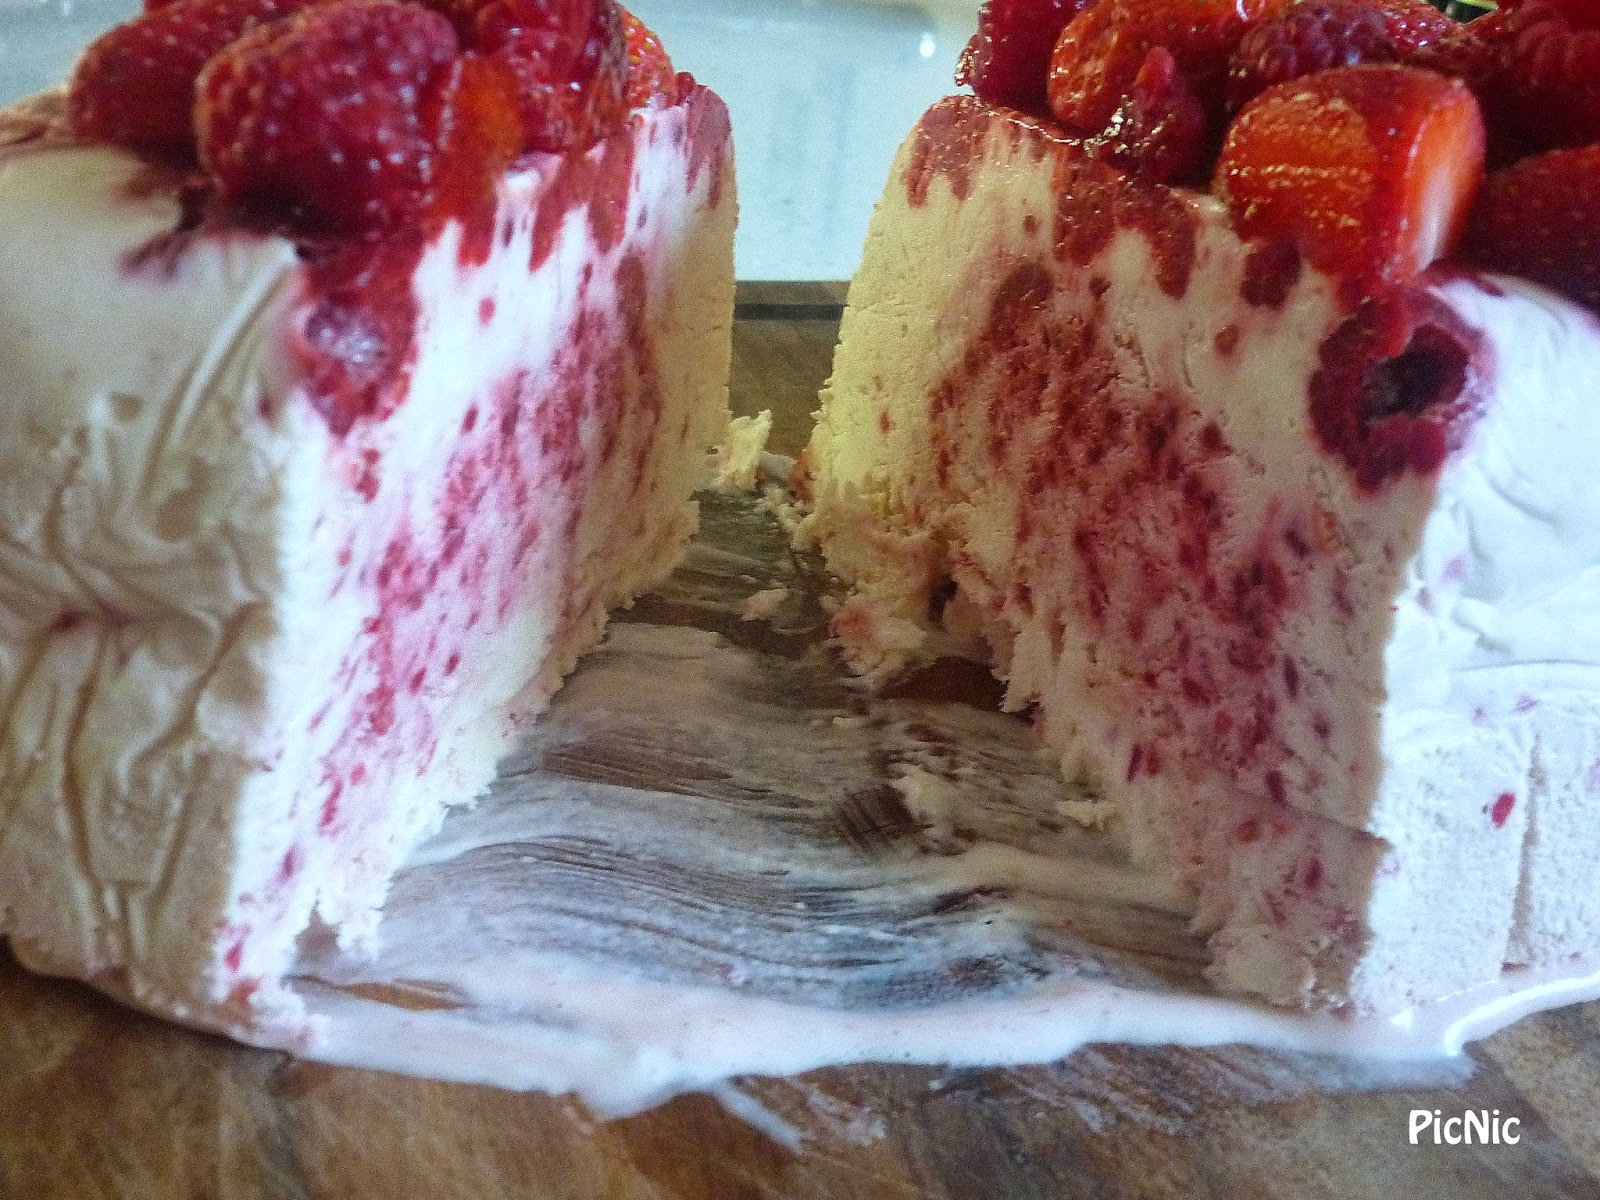
Strawberry and Raspberry Semifreddo

In yesterdays post I said that I would post the recipe to the dessert that I made for my special dinner. Here's the promised recipe!

I wanted to do something nice and summery, using seasonal ingredients. This is the result. It's such a simple dessert to make and oh so delicious. It's so lovely, light, refreshing, and creamy.

Make it a day ahead so that it will be set by the time you are wanting to serve it.


Strawberry and Raspberry Semifreddo

Serves 8 - 10

3 Eggs
2 Egg yolks
1 tsp vanilla bean paste
1 Cup caster sugar (super fine sugar)
3 Cups frozen raspberries (or mixed berries)
2 Cups cream, whipped
Fresh strawberries and raspberries to garnish

1. Line a loaf tin with cling film.

2. Whisk the eggs, egg yolks, vanilla, and sugar over a double boiler for 5 minutes. Remove from heat. Beat with an electric beater until thick and pale.

3.   Crush 2 cups of the berries and fold through the egg mixture. Spread the remaining frozen berries over the base of the lined tin.

4. Fold the whipped cream into the mixture and pour mixture into the tin. Cover with cling film and place in the freezer overnight.

5. Immediately prior to serving, garnish with fresh berries.

Monday, 13 January 2014

Chorizo and Mozzarella Ravioli

On Saturday I spent a lot of my afternoon preparing and cooking a special meal for my boyfriend, no particular reason for it, just wanted to treat him to something extra special. This is what I made as our main. Although it takes a while it is absolutely worth the time and effort as homemade pasta is just fantastic, not to mention fun to make!

I made my pasta using a heart shaped cookie cutter, since I was making it to say "I love you" to my boyfriend.

This would be a lovely dish to make on a special occasion, with Valentines Day coming up next month perhaps?  Also stay tuned for my dessert recipe, I'll post it tomorrow!


Chorizo and Mozzarella Ravioli


Serves 2 - 3

Pasta Dough

Half a recipe of Basic Egg Pasta (Or make the whole thing and keep half for something else)


Ravioli Filling

100 g Chorizo, chopped
1 Cup fresh spinach
1 tsp chilli flakes
salt and pepper to taste
1/3 Cup finely grated mozzarella

Pasta Sauce

1 Onion, finely diced
2 Cloves garlic, crushed, finely chopped, or finely grated
400 g tomatoes (fresh or canned, whatever is most readily available)
1 Tbsp Balsamic vinegar  
Salt and pepper to taste

1 egg + 1 tsp water, whisked together (to seal pasta edges)

1. Make the pasta dough following the directions on the recipe. You can use either a pasta machine or a rolling pin.

2. Make the filling by frying the chorizo with chilli flakes, salt, and pepper for about 4-5 minutes. Add the spinach and allow to wilt. Process to a fine mixture in a food processor or with a stick blender. Set aside.


3. Once the pasta is rested and rolled out into thin sheets make your pasta into shapes (use your imagination!), then cut out pieces using a cookie cutter, alternatively just use a pasta cutter (or pizza cutter) to divide into sections.

5. Fill the pasta by adding approximately teaspoon amounts of the filling mixture to the centre of a piece of pasta, top with a pinch of mozzarella. Take another piece of pasta, brush the edges with egg + water and seal over top of the filled piece, use a fork to press the edges of the two pieces together. Repeat this until all the pasta is filled. Cook the pasta in a large saucepan of boiling, salted water for about 4 minutes, stirring so that it doesn't stick. Removing from the pot using a slotted spoon. 

6. Make the sauce by frying the onion and garlic in a fry pan, add the tomatoes (if fresh, diced) balsamic, salt, and vinegar. Once nice and hot, blend in a food processor and using a stick blender.


Thursday, 9 January 2014

Chicken and Mushroom Risotto

A lot of people have never attempted a risotto at home as people are often under the impression that they are really difficult and hard to get right. If you fall into this group then I suggest you give this recipe a try, I bet it will change your mind! It's nice and easy and bursting with flavour. I can definitely see myself adding this to my regular rotation.

Chicken and Mushroom Risotto

Serves 4

Olive Oil
2 Cups sliced mushrooms
300 g Chicken breast, diced
1 Onion, finely diced
4 Cloves garlic, finely diced
1 1/2 Cups Arborio rice
1/2 Cup white wine
5 Cups chicken stock, warm
1/2 Cup finely grated parmesan, plus extra for sprinkling
Salt and pepper

1. Heat a small amount of oil in a large saucepan over a medium heat.

2. Add the chicken and mushrooms and fry until the chicken is cooked through, about 5 minutes. Remove from the pan and set aside.

3. Return the pan to the heat and add the onion and garlic. Cook for about 2-3 minutes. Add the rice and stir for about 2 minutes, until the rice goes clear.

4. Add the wine, stir often until the wine has been absorbed into the rice.

5. Add half a cup of warm chicken stock, allow the stock to be absorbed, stirring often. Once the stock has been absorbed, add another half cup of stock. Repeat this process until there is only 1/2 cup of stock left (Will take about 25 minutes.)

6. Before adding the final half cup of stock, return the chicken and mushrooms to the pan. Add the final stock and stir until absorbed.

7. Stir through the cheese and season with salt and pepper to taste.

Wednesday, 25 December 2013

Pavlova

I made a pavlova for Christmas dessert this year. This is such a typical New Zealand Christmas dessert so I thought it would be good to share the recipe with all my non-NZ readers. This recipe turned out just lovely. The outside was a nice crisp meringue while the inside was light and fluffy. They key to making a great pavlova (that also doesn't collapse!) is the make sure to not remove it from the oven until it is cool. Don't be tempted to open the oven door for a peak, just leave it be. Another pavlova plus is that it can be made a day or two ahead and then stored in an airtight container. I made mine a day ahead, saved lots of time!


Pavlova


Serves 8 - 10

6 Egg whites, room temperature, not too fresh works well for beating
1/4 tsp salt
1 1/2 Cup caster sugar
1 tsp white vinegar
2 tsp cornflour

To top:

1/2 Cup cream, whipped
Mixed berries/fruits (I used strawberry, raspberry, and kiwi)

1. Preheat oven to 180°C and line a baking tray with non-stick baking paper.

2. In a clean, dry bowl, beat the egg whites and salt until stiff. While the beater is still running, slowly add the sugar. Continue to beat at a high speed for about ten minutes, until the mixture is very thick and stiff and does not fall off the beaters when removed from the mixture.

3. Fold in the vinegar and cornflour.

4. Transfer the mixture to the prepared tray with a large spoon, forming a big circle. Don't flatten out the top, just leave it as a dome so that if it does collapse it will be less likely to form a big crater.

5. Bake at 180°C for 5 minutes, reduce heat to 130°C and continue to bake for 60 minutes. Turn off the oven and leave to cool (leave it in the oven for another hour or so).

6. Before serving, spread over the whipped cream and decorate with berries.

Monday, 23 December 2013

Mushroom Macaroni

I briefly saw a recipe a few weeks ago for a mushroom mac and cheese and thought it sounded great. As I am currently on holiday I have been looking for quick and easy dinners that are still tasty enough to keep everyone happy. I thought I would try out my own version of a mushroom mac and cheese, so here it is! (Since I think I have been over doing the sweets a bit lately).


 Mushroom Macaroni


Serves 4-6

400 g macaroni
2 Cloves garlic, finely diced
250 g lite cream cheese
1/2 Cup cream
125 g Camembert, white part removed.
100 g Edam, grated (plus extra for sprinkling)
400 g mushrooms (I used white button, Portobello, and shiitake)
1 tsp (or thereabouts) dried chilli flakes
Ground black pepper, to taste
1/2 Cup breadcrumbs

1. Cook the macaroni, according to the package instructions.

2. Dice the mushrooms. Whip the cream cheese until light, add chilli flakes and ground black pepper.

3. Heat a small amount of vegetable or olive oil in a large saucepan, add the mushrooms and garlic and fry for a couple of minutes. Add the cream cheese, cream, camembert, and edam. Cook over a medium heat until the cheese has melted.

4. Stir through the macaroni and coat well. Pour into a casserole/oven proof dish. Coat with breadcrumbs and edam cheese and bake until golden (about 15 minutes).


Saturday, 21 December 2013

Malteser Cheesecake

It seems as though my blog has been taken over by cheesecakes recently. Luckily cheesecakes are great so I don't think it's too much of an issue, but I promise to do something different next! I wasn't going to post this one, made it at the request of my boyfriend, but then he said I should post it as it was delicious.

Malteser Cheesecake


Serves 10

250 g Vanilla bisuits
100 g butter, softened
500 g cream cheese
2 tsp vanilla essence
1/4 Cup caster sugar
155 g pack Maltesers, plus extra for topping
1 Cup cream, whipped

1. Make the base by processing the biscuits to a fine crumb in a food processor. Add the butter and process again. Press into the base and up the sides of a 20 cm spingform tin lined with baking paper, or greased.

2.  Add the cream cheese*, sugar, and vanilla to a large bowl and beat with an electric beater until light and creamy.

3. Wipe out the food processor, add the Maltesers and process until broken, enough so that the chunks aren't too large, but it's not just a powder. Fold into the cream cheese mixture.

4.  Fold the whipped cream into the cream cheese mixture and spread over the base, cover and chill until set. Before serving, cut a few Maltesers and half and sprinkle over the top.

*I wanted to make mine a bit lighter so I used half regular cream cheese and half lite cream cheese. It still tastes exactly the same as if you used all normal cream cheese but the consistency will not be quite as firm.


Sunday, 8 December 2013

Vanilla Chocolate Chip Cupcakes with Candy Cane Frosting

I am starting to get pretty excited about Christmas now. Only a week and a half left before we head off on holiday too! In my Christmas excitement I came up with these Christmas themed cupcakes.

On a side note, I think my photography is starting to improve! I have been taking close note of the photography on other food blogs I follow. Think I might have to go back and re-photograph some of my earlier monstrosities.


Vanilla Chocolate Chip Cupcakes with Candy Cane Frosting


Makes 16

Cupcakes:

150 g butter, softened
1 Cup caster sugar
2 eggs
2 tsp vanilla essence
2 1/2 Cups self-raising flour
1 Cup skim milk
1 Cup chocolate chips

Candy Cane Frosting:

5 Candy Canes
100 g butter, softened
1 1/2 Cups icing sugar
2 Tbsp skim milk
Optional: Hershey's kisses to top. 

1. Preheat the oven to 190°C and grease a muffin pan.

2. Beat the butter and sugar until light and creamy. Add the eggs one at a time and beat well after adding each egg.

3. Add the flour, milk and vanilla and mix until combined. Add the chocolate chips and stir them through.

4. Spoon the mixture into the the prepared pan and bake for 20 minutes, or until the cupcakes spring back when gently pressed. 

5. Make the frosting by crushing the candy canes to a powder in a food processor. Add the butter, icing sugar, and milk and process until it is smooth. Once the cupcakes are cool pipe the frosting onto the cupcakes.

I didn't have a piping bag so I just spread mine on with a knife, but it would look a lot more impressive if it was piped on!

Friday, 6 December 2013

Lemon Yogurt Cake

As we go on holiday in a couple of weeks and then move house after we are back I want to try and use up lots of my baking stuff (and perishables before holiday!), don't think it would be too fun potentially getting flour all over everything trying to move it all. The motivation for this recipe was that I had a heap of lite Greek yogurt and eggs sitting in the fridge that need to be used up.


I loved how moist and light this cake turned out. Tasted great with strawberries and ice cream too! I think this would also work nicely as cupcakes with a lemon buttercream icing. If you try making cupcakes let me know how it turned out =)


 Lemon Yogurt Cake


Serves 10 - 12

1 Cup caster sugar
Rind of 2 lemons, finely grated
2 eggs
1/3 Cup canola oil
1 tsp vanilla essence
1 Cup fat free yogurt (I used lite Greek)
1 1/2 Cup self raising flour

1. Preheat oven to 190°C.

2. In a large bowl add lemon rind, sugar, eggs, vanilla, and oil and whisk together. Add the yogurt and lemon juice and whisk again.

3. Sift in the flour and mix until just combined.

4. Pour the mixture into a baking paper/greased 21 cm cake tin, ring cake tin, or loaf tin. 

5. Bake for 30 minutes, or until a skewer inserted into the centre comes out clean. Leave to cool in the tin. If desired, dust with icing sugar once cooled. 

I will add the nutritional information when I can be bothered calculating it. But it should be pretty good since there is no butter =)

Wednesday, 4 December 2013

Homemade After Dinner Mints

When we were doing the grocery shopping on the weekend we were walking past the chocolate section and my boyfriend said we should get some after eights, I said that sounded good (since they are awesome!) although I could probably make them pretty easily. His response was "you can make after eights?!" To me that sounded like a bit of a challenge. Imaginary challenge accepted. So I got thinking of how to go about it. Here's what I came up with. Nailed it.


As you can see, I had a bit of an issue with not making a major mess when cutting into squares. But once I had a taste I realised that it didn't matter whatsoever, tastes exactly like it should!

After Dinner Mints

Makes 16

250 g 72% cocoa dark chocolate
1 Tbsp vegetable oil
1 1/2 Tbsp milk
220 g icing sugar
2 tsp peppermint essence

1. Line a small baking tray with baking paper.

2. Melt half the chocolate over a double boiler, pour into the tray and spread it evenly over the surface by tilting the tray to get it all covered. Place in the refrigerator until set (about 15 minutes).

3. Make the peppermint filling by sifting the icing sugar into bowl. Stir in the oil and milk and combine well to form a smooth paste.

4. Add the essence. Mix well.

5. Spread the filling thinly over the hardened chocolate. Refrigerate for about 30 minutes, until filling is set.

6. Melt the remaining chocolate. Cool slightly. Pour over the peppermint layer and spread evenly. Refrigerate until set.

7. Cut into small pieces with a knife heated slightly under hot water.

I was impatient and did all the chilling in the freezer.